On Ubuntu 18.04 and later versions, there is a new way to set an IP address i.e., Netplan. This tutorial describes how to set an IP address from the command line on Ubuntu Linux by using the Netplan utility.
Set an IP Address with Netplan on Ubuntu
Netplan is the new way to set an IP address on newer versions of Ubuntu (Ubuntu 18.04 and later.) With netplan, network configurations are consolidated and saved under /etc/netplan with a .yaml extension.
Firstly, run the command below to change into the netplan directory and then list the contents of the netplan directory as follows.
$ sudo cd /etc/netplan
$ ls
You should see the default Netplan configuration file. Mine is named 01-network-manager-all.yaml on my Ubuntu 20.04 machine. Yours might be named something slightly different, depending on your Ubuntu version.

It is advisable to create a backup of the default netplan configuration file as follows.
$ sudo cp 01-network-manager-all.yaml 01-network-manager-all.yaml.bk
Next, run the command below to confirm the name of the network interface for which you want to set an IP address.
$ ip addr sh
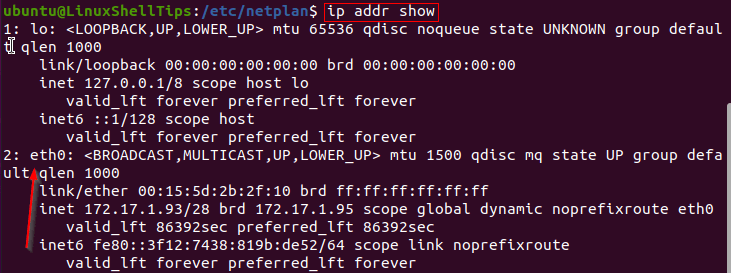
In this example, I am working with network interface eth0.
Configure IP Address in Ubuntu
Now, open the default Netplan configuration file for editing with the command below.
$ sudo nano 01-network-manager-all.yaml
You would need to make changes to the file so that it looks similar to what you see in the image below. In my case, the new additions are marked with a red border.
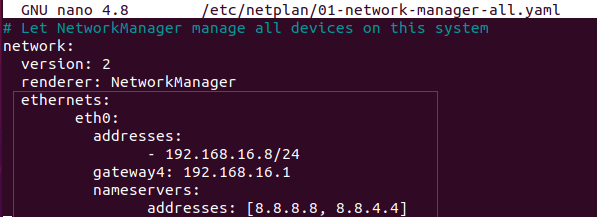
Note: Proper indentation is important when working with YAML configurations. You do not have to use the exact same spacing in my example above. You may choose to use a fixed number of spaces for each level of indentation.
Save and close the configuration file.
Next, run the following command to check for syntax errors in the Netplan configurations.
$ sudo netplan try
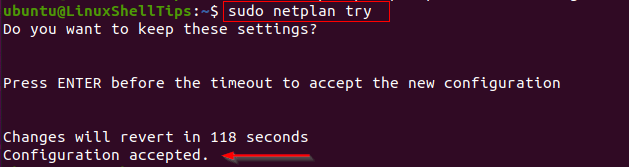
When prompted, press enter to accept the configuration. If the configuration is accepted, you are on course. Otherwise, review your configuration and test again.
Apply Netplan and Verify IP Address
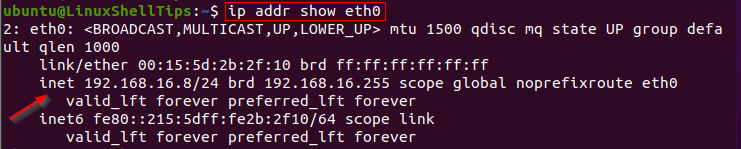
Finally, apply your Netplan configurations with the command below.
$ sudo netplan apply
You may now verify your updated network settings as follows.
$ ip addr show eth0
Conclusion
In this tutorial, we described the steps to set an IP address on Ubuntu by using the Netplan utility. We hope that you find this very helpful.