The concept of web servers has crossed the minds of most, if not all, Linux enthusiasts; especially the ones interested in pursuing web-based projects and careers. Due to the numerous web servers offered to the Linux community, you might feel like tossing a coin or rolling a dice to find the one that ‘might’ suit your web-based needs.
Lighttpd is best attributed as a compatible, very flexible, fast, and secure web server. It is therefore optimized for high performance on whichever operating system environment hosts it.
Also, this web server is indeed light such that it needs very few resources to run or execute its functional objectives like handling AJAX applications. This web server is BSD licensed, open-source, with flawless compatibility on UNIX-like systems.
This article seeks to walk you through the installation and configuration of Lighttpd as an ideal web server for your Ubuntu 20.04 operating system.
Installing Lighttpd on Ubuntu Linux
The first step is always to ensure that your operating system is up-to-date. This step also requires that you are a root user or have Sudo privileges on the Ubuntu 20.04 system you’re using.
$ sudo apt update
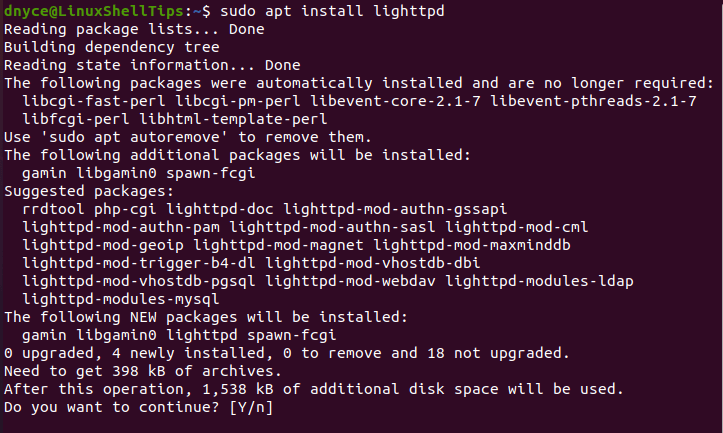
To install Lighttpd, execute the following command on your Ubuntu terminal.
$ sudo apt install lighttpd
The above command will also prompt the installation of additional dependencies needed by Lighttpd.
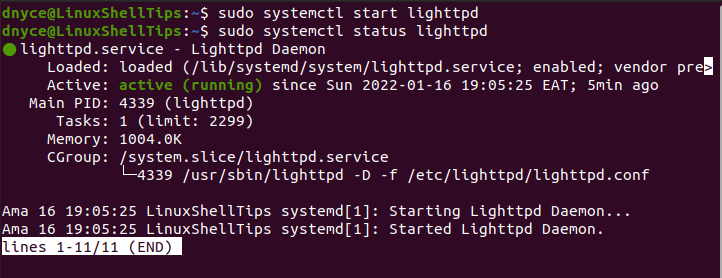
Now that the webserver is installed, we need to start and enable it to keep running even after a successful system boot or reboot.
$ sudo systemctl start lighttpd
$ sudo systemctl enable lighttpd
Check the status of the webserver to be sure that it is running.
$ sudo systemctl status lighttpd
If you are running a UFW firewall, you need to open the following ports to enable access to Lighttpd.
$ sudo ufw allow 80
$ sudo ufw allow 443
OR
$ sudo ufw allow http
$ sudo ufw allow https
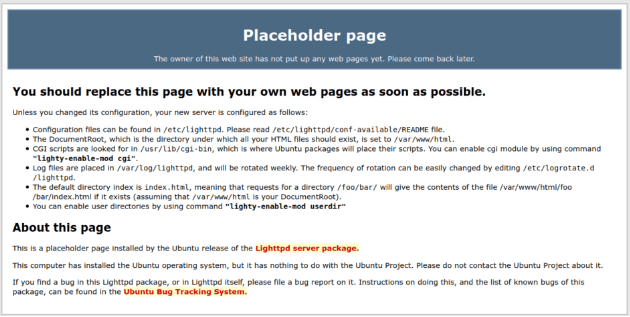
Go to your web browser and use your machine IP address or localhost to be certain that Lighttpd is able to serve web pages on your Ubuntu system.
http://server-ip
OR
http://localhost
Install PHP on Ubuntu Linux
Lighttpd and the PHP programming language greatly complement each other. Since most web applications have PHP as their main backbone, we need to configure its support under Lighttpd.
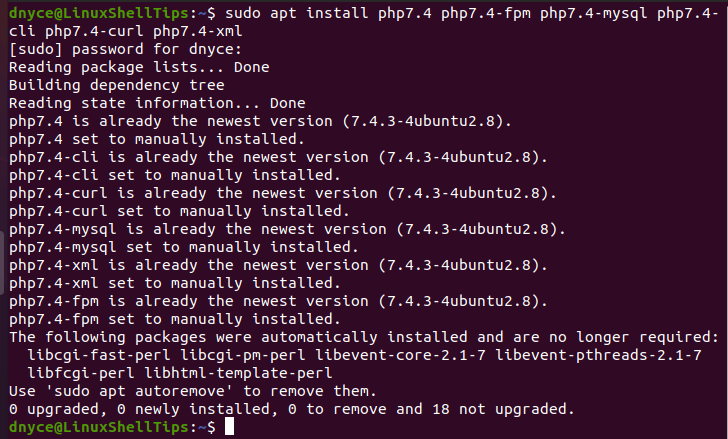
Therefore, you first need to install the following PHP-related packages on your Ubuntu OS.
$ sudo apt install php7.4, php7.4-fpm php7.4-mysql php7.4-cli php7.4-curl php7.4-xml
For Lighttpd and PHP to communicate, we need to open some configuration files and make a few changes.
$ sudo nano /etc/php/7.4/fpm/pool.d/www.conf
Comment out the initial listen = /run/php/php7.4-fpm.sock value and set it to listen = 127.0.0.1:9000 as shown.
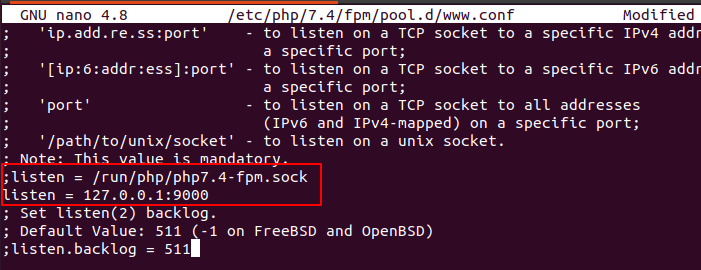
Save and close the file.
Open the following Lighttpd configuration file.
$ sudo nano /etc/lighttpd/conf-available/15-fastcgi-php.conf
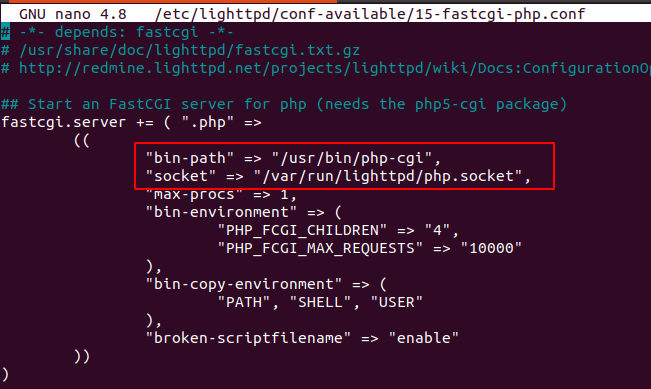
Replace the highlighted lines such that your final configuration file looks like the following:
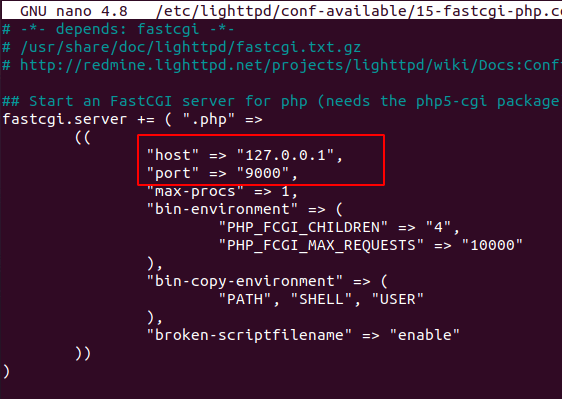
Save the changes and close the file.
Enable the following modules responsible for the communication between Lighttpd and PHP.
$ sudo lighty-enable-mod fastcgi
$ sudo lighty-enable-mod fastcgi-php
We now need php-fpm and Lighttpd services restarted.
$ sudo systemctl restart lighttpd php7.4-fpm
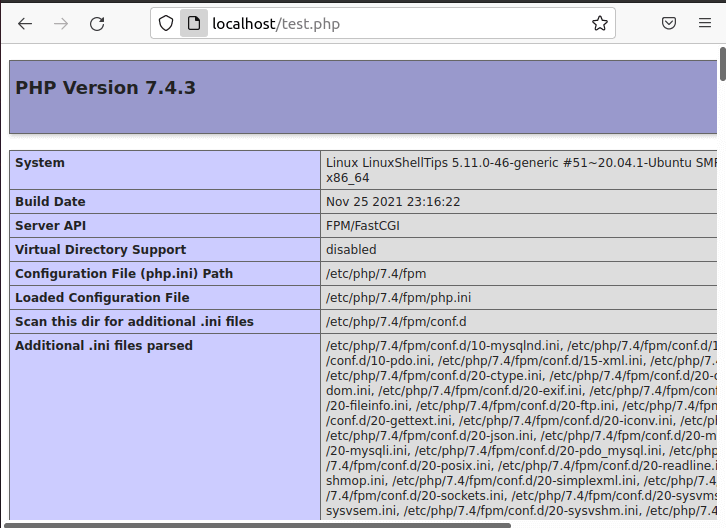
To test Lighttpd’s ability to serve PHP files, create the following PHP script.
$ sudo nano /var/www/html/test.php
and add the following code to it.
<?php phpinfo();?>
Make Lighttpd the owner of the directory that will be serving your PHP web pages.
$ sudo chown -R www-data:www-data /var/www/html/
$ sudo chmod -R 755 /var/www/html/
Now visit/open the test.php file from your web browser to see if Lighttpd was able to interpret it.
http://localhost/test.php
or
http://your-server-ip/test.php
Hosting a Website with Lighttpd in Ubuntu
To host a simple website or web page using Lighttpd, the web pages to be served should reside in /var/www/html directory. For instance, create an index.html file inside this directory.
$ sudo nano /var/www/html/index.html
and add the following HTML code.
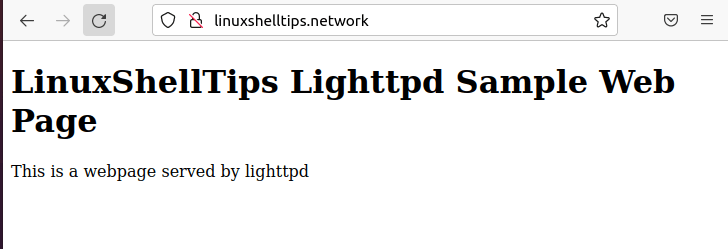
<!DOCTYPE html>
<html>

<head>
  <title>First Lighttpd website</title>
</head>

<body>

  <h1>LinuxShellTips Lighttpd Sample Web Page</h1>
   <p>This is a webpage served by lighttpd!</p>

</body>
</html>
Accessing your server domain should effortlessly serve the above page:
http://linuxshelltips.network
Creating Lighttpd Virtual Host in Ubuntu
This approach is for users that need to serve several websites using Lighttpd. For a domain like linuxshelltips.lan.network, first, create the needed website directory:
$ sudo mkdir /var/www/html/linuxshelltips.lan.network
Change permission and ownership of this directory:
$ sudo chmod -R 755 /var/www/html/linuxshelltips.lan.network
$ sudo chown -R www-data:www-data /var/www/html/linuxshelltips.lan.network
Create the index.html file for this domain:
$ sudo nano /var/www/html/linuxshelltips.lan.network/index.html
and add the following HTML code.
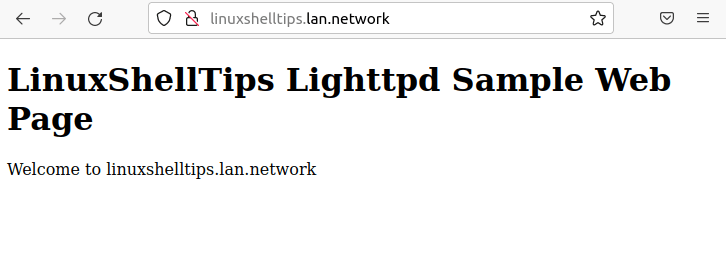
<!DOCTYPE html>
<html>

<head>
  <title>First Lighttpd website</title>
</head>

<body>

  <h1>LinuxShellTips Lighttpd Sample Web Page</h1>
   <p>Welcome to linuxshelltips.lan.network!</p>

</body>
</html>
Next, create a virtual host directory called vhosts.d that will contain the configuration files of all your future websites.
$ sudo mkdir -p /etc/lighttpd/vhosts.d/
Edit the Lighttpd configuration file to include all the content from the above created directory.
$ sudo nano /etc/lighttpd/lighttpd.conf
Add the line:
include_shell "cat /etc/lighttpd/vhosts.d/*.conf"
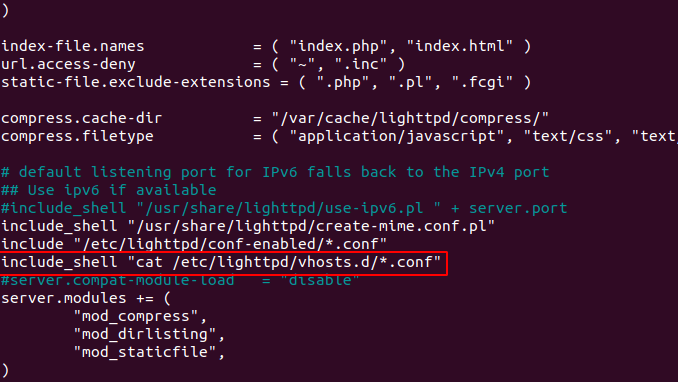
Saves and closes the file.
Create the configuration file for your website:
$ sudo nano /etc/lighttpd/vhosts.d/linuxshelltips.lan.network.conf
and add the following configuration into it.
$HTTP["host"] =~ "(^|.)linuxshelltips.lan.network$" {
    server.document-root = "/var/www/html/linuxshelltips.lan.network"
    server.errorlog = "/var/log/lighttpd/linuxshelltips.lan.network-error.log"
    accesslog.filename = "/var/log/lighttpd/linuxshelltips.lan.network-access.log"
}
Check Lighttpd syntax configuration:
$ sudo lighttpd -t -f /etc/lighttpd/lighttpd.conf

Restart Lighttpd service.
$ sudo systemctl restart lighttpd
Now visit your website URL:
http://linuxshelltips.lan.network
Enable HTTPS for Lighttpd in Ubuntu
To enable HTTPS protocol for your websites served by the Lighttpd web server, we must add the Let’s Encrypt TLS certificate. To install Let’s Encrypt, execute the following command on your terminal:
$ sudo apt install -y certbot
Now request an SSL certificate for your domain and make sure to replace linuxshelltips.lan.network with your domain name:
$ sudo certbot certonly --webroot -w /var/www/html/ -d linuxshelltips.lan.network
Enable the SSL module for Lighttpd:
$ sudo lighttpd-enable-mod ssl
Next, open and edit the SSL configuration for Lighttpd:
$ sudo nano /etc/lighttpd/conf-enabled/10-ssl.conf
Your $SERVER["socket"] the section should resemble the following configuration. Also, remember to replace the linuxshelltips.lan.network with your domain name.
$HTTP["scheme"] == "http" {
        $HTTP["host"] == "linuxshelltips.lan.network" {
                url.redirect = ("/.*" => "https://linuxshelltips.lan.network$0")
        }
}

$SERVER["socket"] == "0.0.0.0:443" {
        ssl.engine  = "enable"
        ssl.pemfile = "/etc/letsencrypt/live/linuxshelltips.lan.network/fullchain.pem"
        ssl.privkey = "/etc/letsencrypt/live/linuxshelltips.lan.network/privkey.pem"
        ssl.cipher-list = "HIGH"
}
Restart Lighttpd after saving and closing the above file.
$ sudo systemctl restart lighttpd
visiting http://your-domain-name should redirect you to https://your-domain-name.
With Lighttpd installed and its PHP support and configuration enabled, you are now fully equipped to test its performance for your web-based projects.