Written in PHP, PHP Composer is an application-level package management tool for PHP programming language. It’s not exactly a package manager in the same sense as conventional package managers such as APT or DNF. Rather, it handles libraries and packages on a per-project basis, installing them inside your project’s directory.
Thus, it can also be referred to as a dependency management tool for PHP. In case you have a project that depends on a given number of libraries, and some of those libraries depend on other libraries, then PHP Composer will allow you to declare the libraries they depend on and find out which packages need to be installed and installs them into your project.
In this topic, we will demonstrate how to install PHP Composer in Rocky Linux 8.
Installing PHP in Rocky Linux
To get the ball rolling, you need to install PHP. At the moment, Rocky Linux repositories only provide PHP 7.2, PHP 7.3, and PHP 7.4. To install PHP 8.0 and later versions, you need to install PHP from the Remi repository.
PHP Composer requires a minimum of PHP 5.3.2 and with that, we will install PHP 7.4 since the requirement is satisfied.
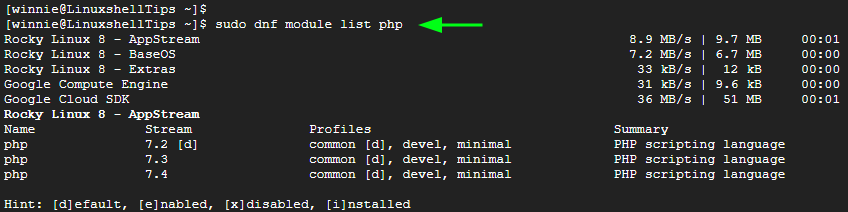
To list the versions currently supported on the repositories, run the command:
$ sudo dnf module list php
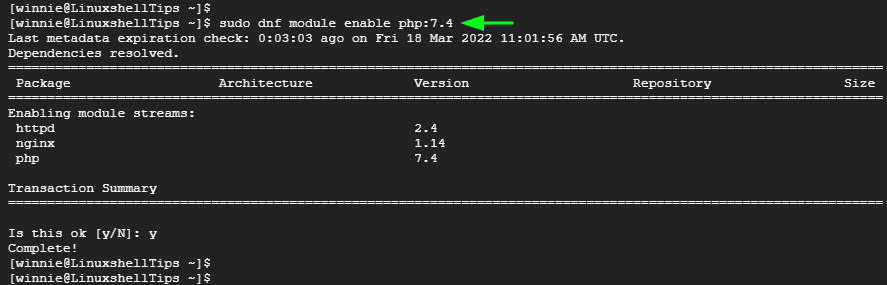
Next, enable PHP 7.4 module on the command line as shown.
$ sudo dnf module enable php:7.4
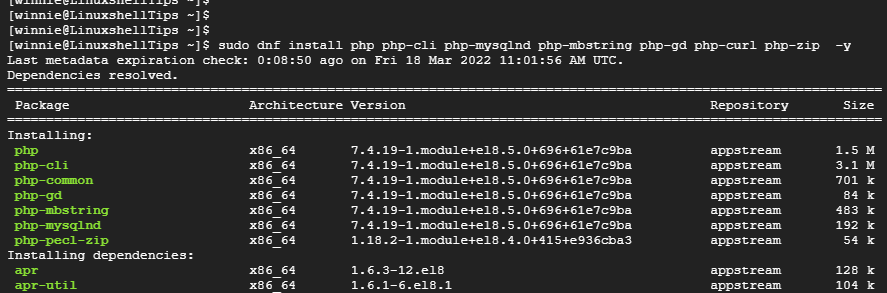
Then install PHP and associated PHP modules as follows.
$ sudo dnf install php php-cli php-mysqlnd php-mbstring php-gd php-curl php-zip -y
With the installation complete, verify the version of PHP installed as shown.
$ php -v

Perfect! PHP 7.4 has successfully been installed. Let us now install PHP Composer.
Installing PHP Composer in Rocky Linux
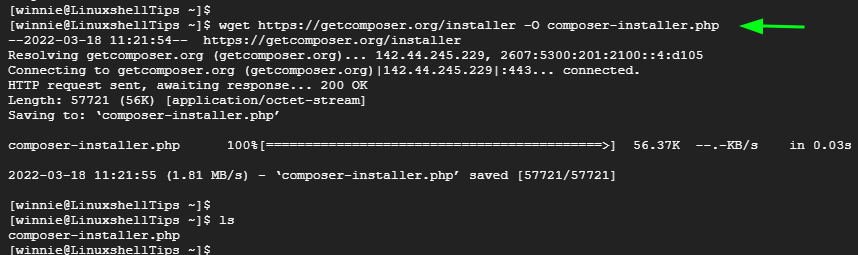
The next step is to download the PHP Composer installer on your system. To do so, use the wget utility as follows.
$ wget https://getcomposer.org/installer -O composer-installer.php
Now, use the installer to install PHP Composer to the /usr/local/bin directory.
$ sudo php composer-installer.php --filename=composer --install-dir=/usr/local/bin
You should get some output similar to what we have here.

And with that, PHP Composer has successfully been installed. To confirm that Composer has been installed, run the command.
$ composer -V
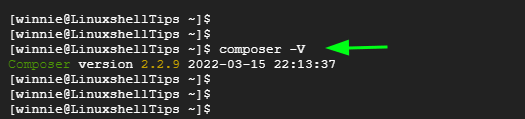
The output displays the Composer version which is the latest version ( 2.2.9) at the time of installation.
Install PHP Composer to Directory
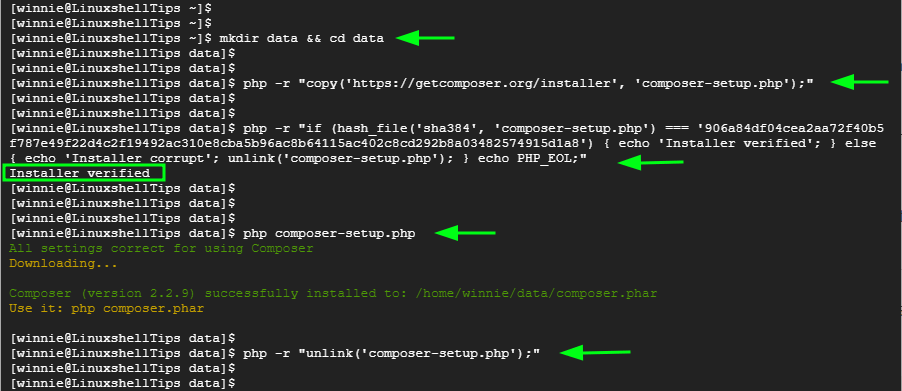
To install Composer in a specific directory, for example, we have created a directory called data, run the following commands:
$ cd data
$ php -r "copy('https://getcomposer.org/installer', 'composer-setup.php');"
$ php -r "if (hash_file('sha384', 'composer-setup.php') === '906a84df04cea2aa72f40b5f787e49f22d4c2f19492ac310e8cba5b96ac8b64115ac402c8cd292b8a03482574915d1a8') { echo 'Installer verified'; } else { echo 'Installer corrupt'; unlink('composer-setup.php'); } echo PHP_EOL;"
This command verifies if the installer is verified. If all is good, you should get the output “Installer verified”.
Next, run the following commands to complete the setup.
$ php composer-setup.php
$ php -r "unlink('composer-setup.php');"
Once again, verify that Composer has been installed.
$ composer -V
And that’s it. We have successfully installed PHP Composer on Rocky Linux 8.