The most widely used Linux distributions, for example, Debian, Ubuntu, RedHat, Fedora, and many more, have a packaging system for distribution software. Binaries and configuration files of software are bundled in a package, which is nothing but an archive file, from which the package managers install the software.
However, advanced Linux users, developers, and those who are more on the geeky side of things often install software directly from the source code; i.e., manual compilation and installation.
As almost all software in GNU/Linux systems is free and open-source software, the source code is publicly available, usually in a version control system repository or even in the standard repositories in some distributions.
Let us take a look at how you can install software directly from its source code in Linux. For the purpose of demonstration, I am using Ubuntu 20.10. However, the steps are common to all Linux distributions.
Downloading the Source Code
The source code of any open-source software is usually available in a version control system, for example, Git. Developers also often maintain a source code download page on their website, from where the source code archive files can be downloaded.
As an example, I will try to install the text editor ‘Vim‘ from the source. First of all, install Git if it is not already present in the system, with the following command:
$ sudo apt install git    [On Debian, Ubuntu & Mint]
$ sudo yum install git    [On RHEL, CentOS & Fedora]
$ sudo pacman -S git      [On Arch & Manjaro Linux]
$ sudo zypper in git-core   [On OpenSuse]
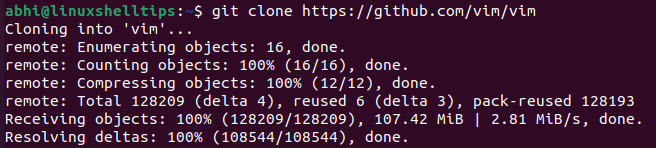
Then download the Vim source code using Git with the following syntax:
$ git clone https://github.com/vim/vim
If the source code for your software is not available via Git, you need to download the ‘.tar.gz’ package, extract the source code from the package with the following command:
$ tar -xvzf <tar_package>
Once the Git repository is cloned, or the package is extracted, go to the source code folder.
$ cd vim

You can see the source code files for Vim in the screenshot above.
Installing Vim from Source Code
The first step while installing software from the source is to install the development tools. In Debian and Ubuntu, they are part of the package ‘build-essential‘.
In RedHat, CentOS, etc. these tools are a part of the Development Tools group. This package installs the most common software which are required to compile source code.
$ sudo apt install build-essential             [On Debian, Ubuntu & Mint]
$ sudo yum groupinstall "Development Tools"    [On RHEL, CentOS & Fedora]
$ sudo pacman -S base-devel                    [On Arch & Manjaro Linux]
$ sudo zypper install -t pattern devel_C_C++   [On OpenSuse]
Next, run the ‘./configure‘ file inside the Vim directory. The configure file is a script that checks various things; for example, if required environment variables are set, or if the dependencies required for the software are met in your system.
$ ./configure
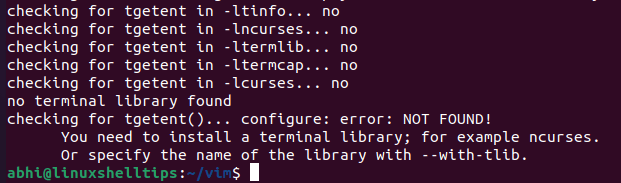
As you can see, the configure script has shown the error that no terminal library was found and suggested a library ‘ncurses‘. To install ‘ncurses‘ and all such missing dependencies use the package manager depending on which distro you are using.
$ sudo apt-get install libncurses5-dev libncursesw5-dev  [On Debian, Ubuntu & Mint]
$ sudo yum install ncurses-devel                         [On RHEL, CentOS & Fedora]
$ sudo pacman -S ncurses                                 [On Arch & Manjaro Linux]
$ sudo zypper install ncurses                            [On OpenSuse]
and then run ‘./configure‘ again.
$ ./configure
Once the configure script is successfully completed, the next step is to compile the source code to generate the binaries. Run the ‘make‘ command to achieve this:
$ make
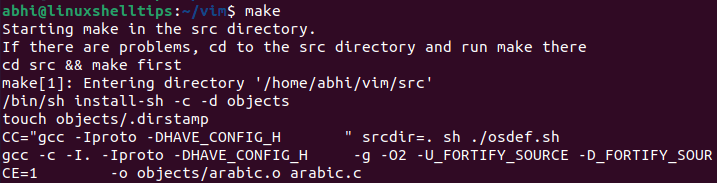
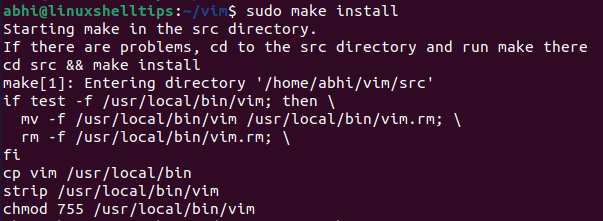
Make will take some time to compile, depending on the size of your software. Once ‘make‘ completes, the binary files are ready. Run the following to install the binaries and the configuration files in appropriate locations:
$ sudo make install
Once the command completes successfully, verify if Vim has been installed:
$ vim --version

This completes the process of installing software in Linux from the source code.
Conclusion
We saw in a few easy steps how to install software from source in Linux. Obviously, software installed in this way is not managed by a package manager and hence all the latest updates, including the vital security updates, cannot be applied on Vim in this case.
Hence, this way should not usually be used for productive usage; only for development, learning, and similar purposes. Thanks a lot for reading and share your thoughts with us in the comments below!