In the previous article, we have seen how to install Centos 7 Minimal on VirtualBox. In this article, you will learn how to install guest additions in VirtualBox.
Guest additions are drivers and software applications that enable some of the features in VirtualBox which is not enabled by default.
Guest additions features include:
- Improved Video support.
- Mouse point Integration.
- Shared folder support between Host and Guest operating system.
- Shared Clipboard between Host and Guest Operating system.
- Better time synchronization between Host and Guest Operating systems.
Install Guest Additions in VirtualBox
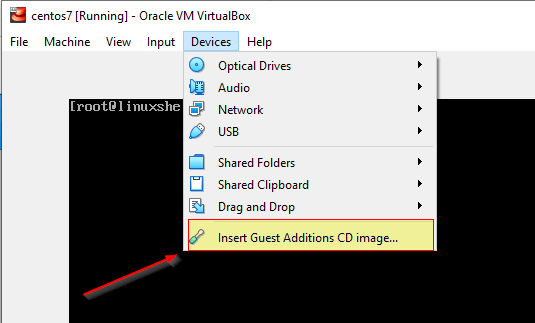
Guest additions come with the VirtualBox package so you don’t need to download it separately. To install guest additions you need a guest OS machine running. Go to “Devices ⇒ Insert Guest Additions CD Image ⇒ Run”.
Type the following command to mount the Guest addition and run the installer.
# mount /dev/cdrom /mnt
# cd /mnt
# ./VBoxLinuxAdditions.run
# reboot
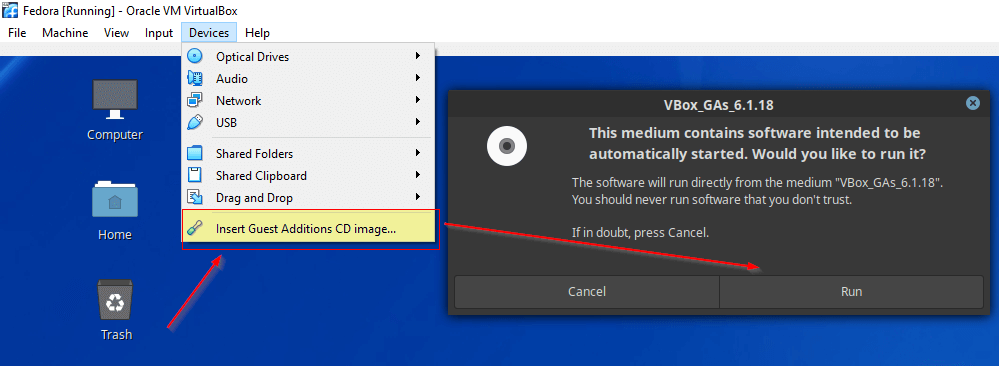
In case if we run any Linux OS with a Desktop version the installation will be automatically taken care of. Once you press “Insert Guest Additions CD image” automatically Installer will start running.
You will get a message as shown below. Reboot the VM machine to make the changes to be effective.
VirtualBox Guest Additions: Running kernel modules will not be replaced until the system is restarted
Press Return to close this window...
Now when you reboot the machine the first thing you will notice is your display resolution is automatically adjusted according to the size of the screen. You never need to explicitly set the display resolution.
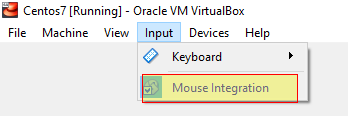
Enable Mouse Integration in VirtualBox
Mouse point integration will only be supported once the Guest addition is installed. You can see from the below image the option is grayed out.
Normally when you click inside the VM machine your mouse will be united with VM. To bring the mouse back to the host os you need to press the CTRL key that will release the mouse from VM. Guest additions support mouse point integration which allows you to use mouse between VM and Host machine without pressing any keys.
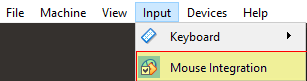
Go to Input and Press Mouse Integration to enable it. To disable it press the same option again.
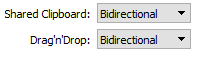
Enable Shared Clipboard and Drag/Drop in VirtualBox
You can use a shared clipboard between your Host OS and Guest OS by enabling the shared clipboard feature. You can also drag any files from the host machine to the guest machine through the drag and drop feature. To enable both the feature go to “Machine ⇒ Settings ⇒ General ⇒ Advanced”.
There are different options on how to set both the features. I always prefer setting it to bidirectional.
Enable Shared Folder in VirtualBox
The shared folder option enables you to mount directories from the host machine to the guest VM. This gives an advantage of working with files and directories that can be accessed from both Guest VM and Host OS. To enable a shared folder follow the below method.
Go to “Machine ⇒ Settings ⇒ Shared Folders”. You have to fill the folder path in your local file system and mount the point location in your guest OS. You have to choose “Auto Mount” options so shared folders will be automatically mounted and no need of adding any entries in fstab.
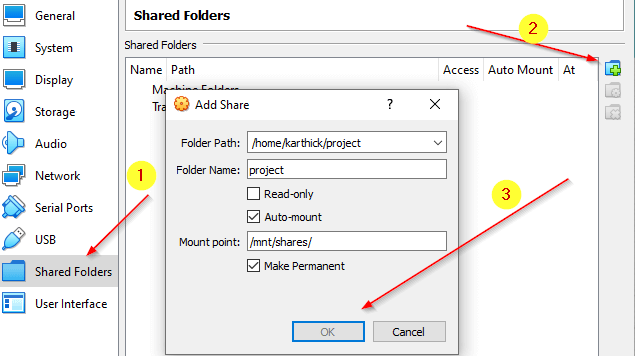
The shared files and directory will be owned by root in your Guest OS. In order to access it with any normal user add the user to the vboxsf group.
$ sudo usermod -a -G vboxsf karthick # change whatever name you want
In the next article, we will be talking about different networking options in VirtualBox.
New to VBox, I had searched a lot for a simple answer to how to run the Guest Additions and how to resize the screen – you provided both answers in simple to understand instructions.
THANK YOU!!
Very useful article.
After adding the user to the vboxsf group, I had to reboot.