Brief: This article guide demonstrates the installation and usage of WebSSH (a web-based SSH client) for users to be able to easily authenticate and connect to SSH servers from web browsers.
For most Linux users, the traditional approach of connecting to remote servers via an SSH client has always been through a command-line environment. However, WebSSH simplifies client-to-server SSH connection by providing an easy-to-use web interface, which is written in Python and based on xterm.js, paramiko, and tornado.
WebSSH Features
- Supports modern browsers like Chrome, Edge, Firefox, Opera, and Safari.
- Implements a resizable terminal Window.
- The target SSH server’s default encoding is automatically detected.
- Supports full-screen terminal.
- Supports Two-Factor Authentication.
- Supports encrypted keys.
- Supports SSH public key authentication with the inclusion of DSA RSA ECDSA Ed25519 keys.
- Supports SSH password authentication with the inclusion of empty passwords.
Step 1 – Installing WebSSH Dependencies (Python and PIP)
Since Python is a major requirement before installing and using WebSSH, you need to make sure that it is installed on your system.
$ sudo apt install python3         [On Debian, Ubuntu and Mint]
$ sudo yum install python3         [On RHEL/CentOS/Fedora and Rocky Linux/AlmaLinux]
$ sudo emerge -a dev-lang/python   [On Gentoo Linux]
$ sudo apk add python3             [On Alpine Linux]
$ sudo pacman -S python3           [On Arch Linux]
$ sudo zypper install python3      [On OpenSUSE]
Next, you need to install Python PIP, which is used to install Python modules and libraries on the system.
$ sudo apt install python3         [On Debian, Ubuntu and Mint]
$ sudo yum install python3         [On RHEL/CentOS/Fedora and Rocky Linux/AlmaLinux]
$ sudo emerge -a dev-lang/python   [On Gentoo Linux]
$ sudo apk add python3             [On Alpine Linux]
$ sudo pacman -S python3           [On Arch Linux]
$ sudo zypper install python3      [On OpenSUSE]
Once installed, you can confirm Python and PIP versions using the following commands.
$ python3 -V
$ pip --version

Step 2 – Installing WebSSH in Linux
With Python and Python PIP installed on your system, we can finally install WebSSH:
$ pip3 install webssh
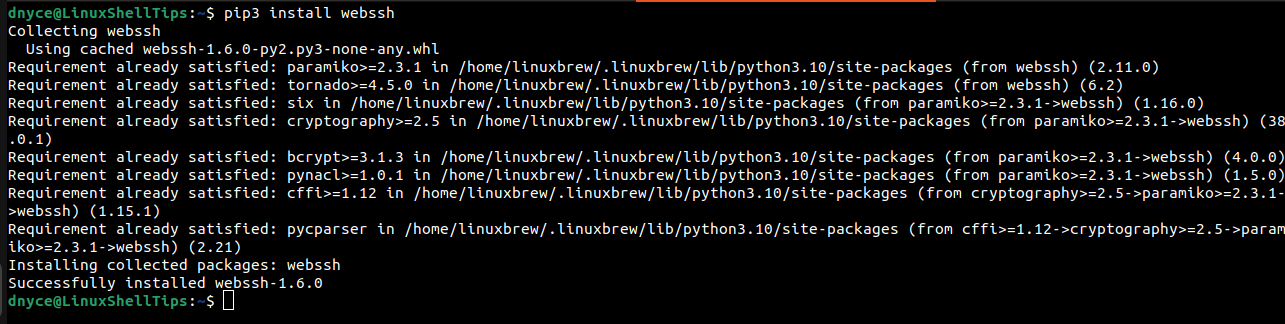
Confirm the installed WebSSH version by running:
$ wssh --version

1.6.0
Step 3 – Connecting to Linux Terminal from Web Browser Using WebSSH
If you’ve installed WebSSH on a local system, you can start the WebSSH by running the following command.
$ wssh
If you’ve installed WebSSH on a remote Linux system, you need to add an additional parameter to the following command, which will allow remote connections over HTTP protocol, which is not secure by default, therefore you need to secure it by enabling HTTPS, as discussed later in the article.
$ wssh --fbidhttp=False

As depicted in the screenshot above, we will be using port 8888, which must be allowed on your firewall.
$ sudo ufw allow 8888
OR
$ sudo firewall-cmd --zone=public --add-port=8888/tcp
On your Web Browser, navigate to the following address to connect to WebSSH by providing regular SSH credentials as shown.
http://127.0.0.1:8888
OR
http://your_domain:8888
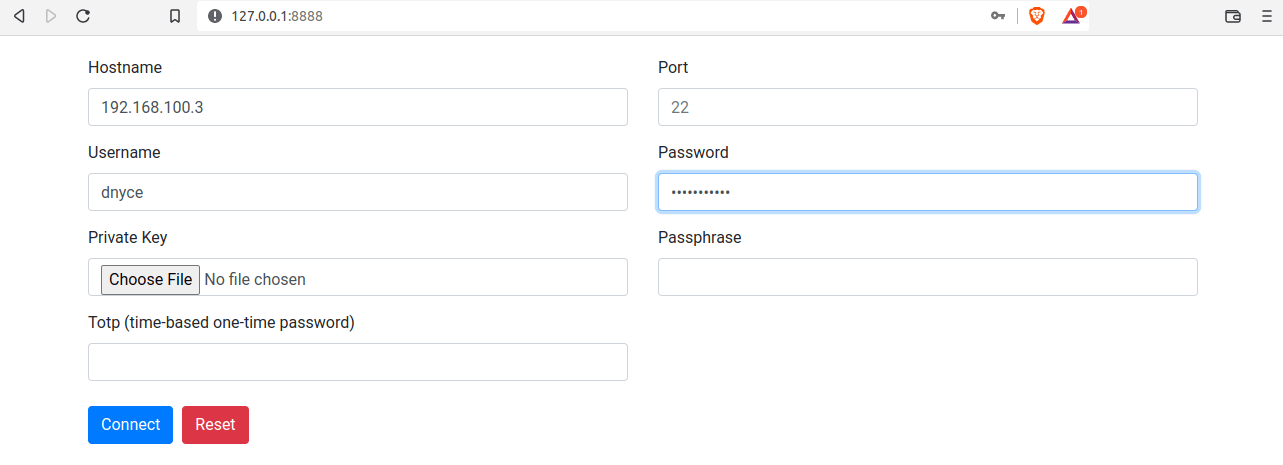
For key-based authentication, upload your SSH key file usually located in the ~/.ssh folder. Use the keyboard shortcut Ctrl+h to show hidden files and directories before uploading the file.
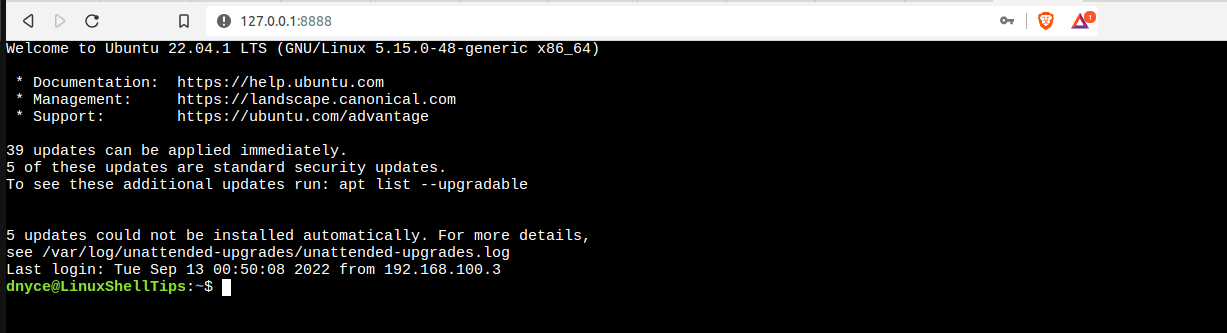
Upon successfully connecting to your remote machine, you will be presented with the following browser interface:
Step 4 – Securing WebSSH with SSL Certificate
This step assumes you have a registered domain name and an active LetsEncrypt SSL Certificate. The SSL certificates associated with your domain name should be in the directory location:
/etc/letsencrypt/live/your_domain_name
Your certificate files in this directory will have a .pem file extension e.g fullchain.pem and privkey.pem.
For WebSSH to run with HTTPS support, the path to the cert file (fullchain.pem) and key file (privkey.pem) should be provided.
First, make sure your firewall permits port 4433 used by WebSSH for HTTPS access:
$ sudo ufw allow 4433
OR
$ sudo firewall-cmd --zone=public --add-port=4433/tcp
From here, launch the WebSSH server by pointing it to the domain name cert and key files:
$ sudo wssh --certfile='/etc/letsencrypt/live/your_domain_name/fullchain.pem' --keyfile='/etc/letsencrypt/live/your_domain_name/privkey.pem'
To access the WebSSH web browser interface via HTTPS, implement:
https://127.0.0.1:4433
OR
https://your_domain:4433
Step 5 – Running WebSSH Behind Nginx Reverse Proxy
In this step, user requests to WebSSH will be handled by Nginx (Reverse Proxy), for this to work, you need to install and configure Nginx as a reverse proxy.
$ sudo apt install nginx             [On Debian, Ubuntu and Mint]
$ sudo yum install nginx             [On RHEL/CentOS/Fedora and Rocky Linux/AlmaLinux]
$ sudo emerge -a www-servers/nginx   [On Gentoo Linux]
$ sudo apk add nginx                 [On Alpine Linux]
$ sudo pacman -S nginx               [On Arch Linux]
$ sudo zypper install nginx          [On OpenSUSE]
Next, allow Nginx access to ports 80 and 443 on your firewall.
$ sudo ufw allow “Nginx Full”
Or
$ sudo firewall-cmd --permanent --zone=public --add-port=80/tcp
$ sudo firewall-cmd --permanent --zone=public --add-port=443/tcp
Create Nginx configuration for WebSSH:
$ sudo nano /etc/nginx/sites-available/webssh
Paste the following info and replace your_domain_name with your actual domain name:
server {
    listen 80 default_server;
    listen [::]:80 default_server;
    server_name your_domain_name www.your_domain_name
    root /var/www/html;

    access_log /var/log/nginx/webssh.access.log;
    error_log /var/log/nginx/webssh.error.log;

    location / {
        proxy_pass http://127.0.0.1:8888;
        proxy_http_version 1.1;
        proxy_read_timeout 300;
        proxy_set_header Upgrade $http_upgrade;
        proxy_set_header Connection "upgrade";
        proxy_set_header Host $http_host;
        proxy_set_header X-Real-IP $remote_addr;
        proxy_set_header X-Real-PORT $remote_port;
    }

    listen 443 ssl;
    # RSA certificate
    ssl_certificate /etc/letsencrypt/live/your_domain_name/fullchain.pem;
    ssl_certificate_key /etc/letsencrypt/live/your_domain_name/privkey.pem;

    # For Redirecting non-https traffic to https
    if ($scheme != "https") {
        return 301 https://$host$request_uri;
    }
}
Activate the webssh configuration file:
$ sudo ln -s /etc/nginx/sites-available/webssh /etc/nginx/sites-enabled/webssh
Remove the Nginx default configuration file to avoid conflicts with the newly created Nginx WebSSH configuration file:
$ sudo rm /etc/nginx/sites-enabled/default
Verify Nginx configuration:
$ sudo nginx -t
You can also remove ports 8888 and 4433 from your firewall rules since Nginx will be handling all traffic.
Restart WebSSH without specifying the cert and key files’ paths.
$ wssh
From here, you can now directly access your domain name from your web browser without specifying a port.
https://your_domain_name
Step 6 – Creating WebSSH Systemd File
So far, we have automated all steps except for launching the wssh server from the system using a command line environment. To automate this step, we need to set up a background service.
We need to create a unit file and close the wssh server if it is still running with Ctrl+C keyboard keys.
Create a WebSSH service file:
$ sudo nano /etc/systemd/system/webssh.service
Add the following to the file:
[Unit]
Description=WebSSH terminal interface
After=network.target

[Service]
User=www-data
Group=www-data
ExecStart=wssh

[Install]
WantedBy=multi-user.target
The value for ExecStart under [Service] can be found by running:
$ whereis wssh

wssh: /home/linuxbrew/.linuxbrew/bin/wssh
In the above case, the value input will be:
[Service]
User=www-data
Group=www-data
ExecStart=/home/linuxbrew/.linuxbrew/bin/wssh
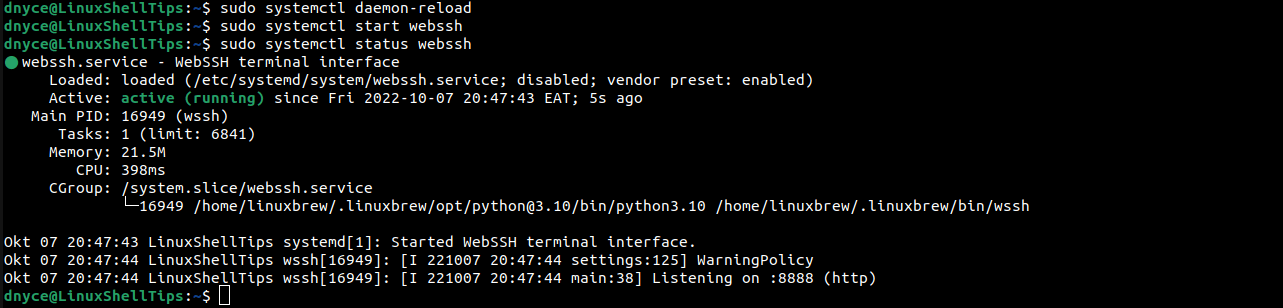
We can now start and enable WebSSH with the following commands:
$ sudo systemctl start webssh
$ sudo systemctl enable webssh
$ sudo systemctl status webssh
Each time you reload your domain name URL (http://your_domain_name), You will be able to use a fresh WebSSH session with WebSSH and Nginx running in the background.
WebSSH makes it flexibly easy to access and manage your remote machines from the comfort of a modern and secured Web Browser.