Disk usage, in short du, is a standard Linux command that helps to get system disk usage information quickly. Although the output of the command is not that much intuitive and delightful.
Hence, you might want to look for alternatives to the du command to check disk utilization in Linux. In this article, we will learn about various du command alternatives, including command line and graphical applications.
Command Line Alternative for ‘du’ Command in Linux
There is no limited number of commands available as an alternative to du. Since du is free and open source, lots of forked projects have been created using modern popular languages like Golang and Rust with additional functionality and colorful output.
So, I’ll be listing a few du command alternatives that are easy to install and work around with intuitive output. The order is not rank-based as each command has a different way to display output, whose comfortability can differ person-to-person.
1. Duc Command
Duc is in itself a collection of tools for analyzing disk usage and displaying it in a number of user interfaces. Since duc maintains its own database of accumulated sizes of directories of the file system, it allows you to query the database and create fancy graphs as well.
To install duc on Ubuntu, Linux Mint, Pop_OS!, and other Debian-based distributions, run:
$ sudo apt-get install duc
For other Linux-based operating systems, you need to download the duc latest archive file and install it manually using the command:
$ tar xvf duc-1.4.5.tar.gz
$ cd duc-1.4.5
$ ./configure
$ make
$ make install
Once installed, the first and foremost thing you need to do is index the directory you want to analyze using the below command, or else you’ll get a database not found error.
$ duc index <directory-path-to-index>

The command will create a database at the default location ~/.duc.db, which duc uses to display disk usage of all files and directories under the indexed directory.
To view disk usage using duc, run:
$ duc ls -Fg <indexed-directory-path>

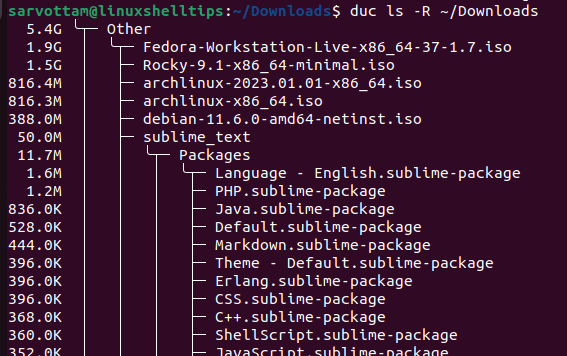
You can also use other available options for duc to change the output view, like -R options for the tree view:
$ duc ls -R <indexed-directory-path>
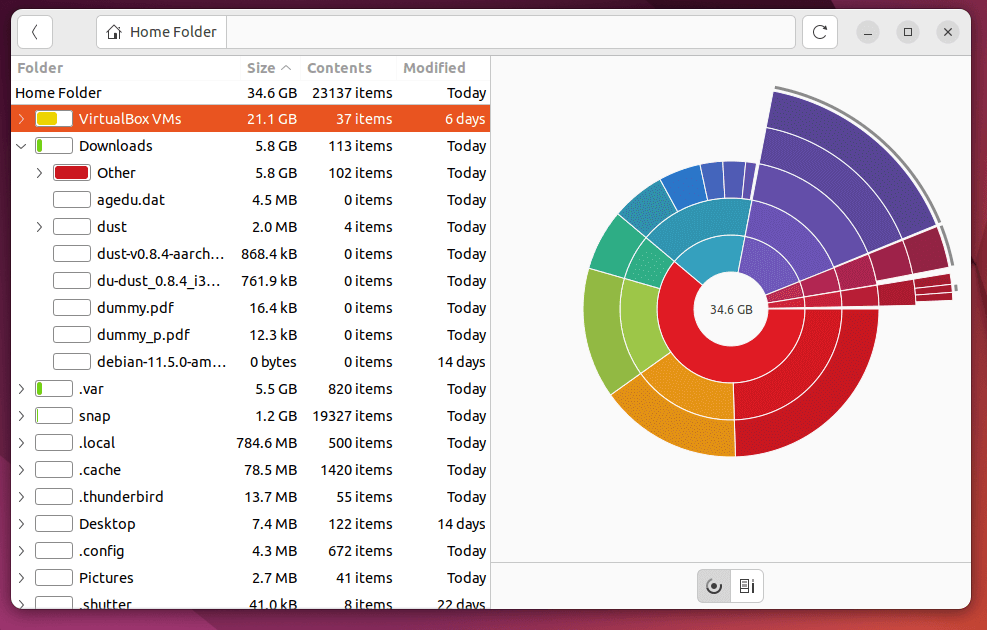
Even, duc provides a graphical interface as well to explore the file system using sunburst graphs.
$ duc gui <directory-path>
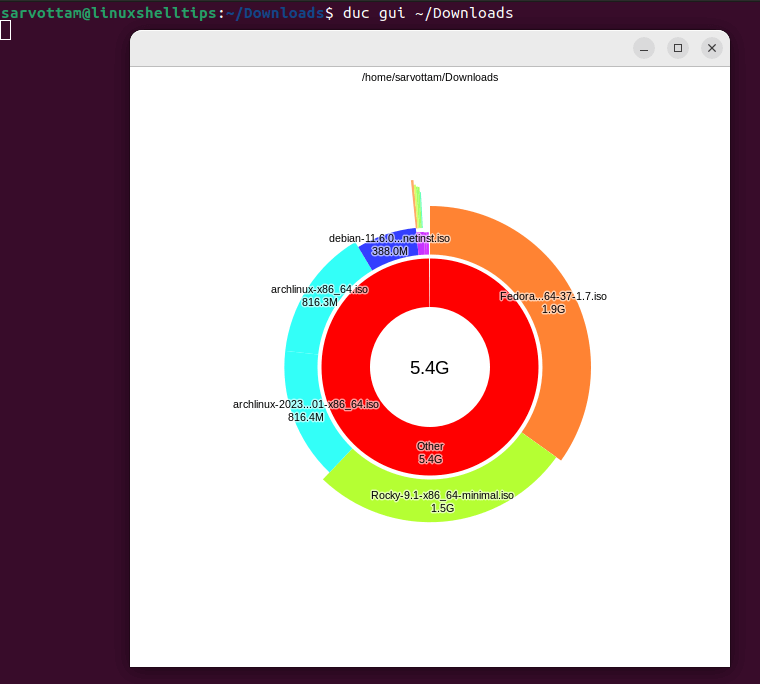
You can click on a particular ring section to further analyze that directory only.
Not just a graphical display, duc also gives you the option to explore disk usage data in a terminal-based user interface (TUI) or ncurses console interface.
$ duc ui <directory-path>
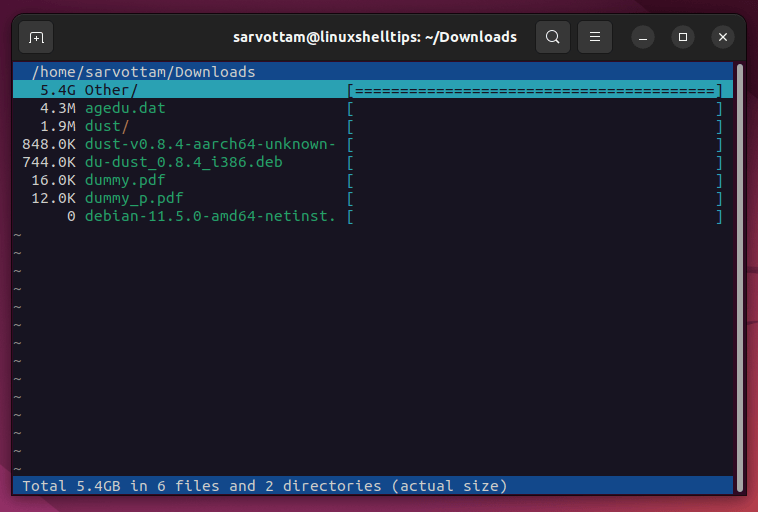
You can use arrow keys to navigate up and down and press the Enter key to go inside the directory.
2. Gdu Command
Written in Golang programming languages, Gdu is a fast disk usage analyzer with primarily a console-based colorful interface only.
To install gdu on Ubuntu, Linux Mint, Pop_OS!, and other Debian-based distributions, run:
$ sudo add-apt-repository ppa:daniel-milde/gdu
$ sudo apt-get update
$ sudo apt-get install gdu
For other Linux-based distributions, you can install it using the curl command:
$ curl -L https://github.com/dundee/gdu/releases/latest/download/gdu_linux_amd64.tgz | tar xz
$ chmod +x gdu_linux_amd64
$ mv gdu_linux_amd64 /usr/bin/gdu
Once you install gdu successfully, hit ‘gdu‘ in the terminal, which will open a terminal-based user interface to analyze the current directory:
$ gdu
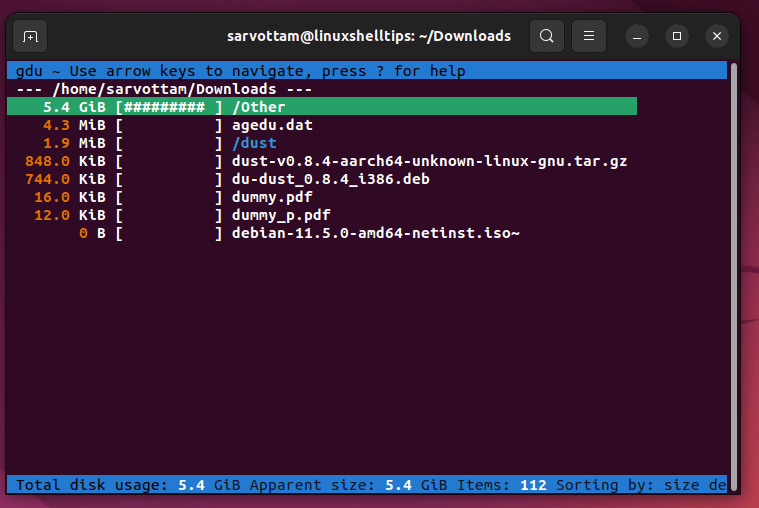
You can also pass the directory path as an argument to analyze only the given directory:
$ gdu <dir-path-to-analyze>
3. Ncdu Command
Ncdu stands for NCurses Disk Usage, which is also a disk usage analyzer with a text-based user interface that brings a keyboard-handling facility to a text-based terminal. Though its output is not that colorful as compared to the duc and gdu commands.
To install ncdu on Linux distributions, run:
$ sudo apt install ncdu         [On Debian, Ubuntu and Mint]
$ sudo yum install ncdu         [On RHEL/CentOS/Fedora and Rocky Linux/AlmaLinux]
$ sudo emerge -a sys-fs/ncdu    [On Gentoo Linux]
$ sudo apk add ncdu             [On Alpine Linux]
$ sudo pacman -S ncdu           [On Arch Linux]
$ sudo zypper install ncdu      [On OpenSUSE]
Once installed, you can directly type ncdu in a terminal and hit to analyze your filesystem:
$ ncdu
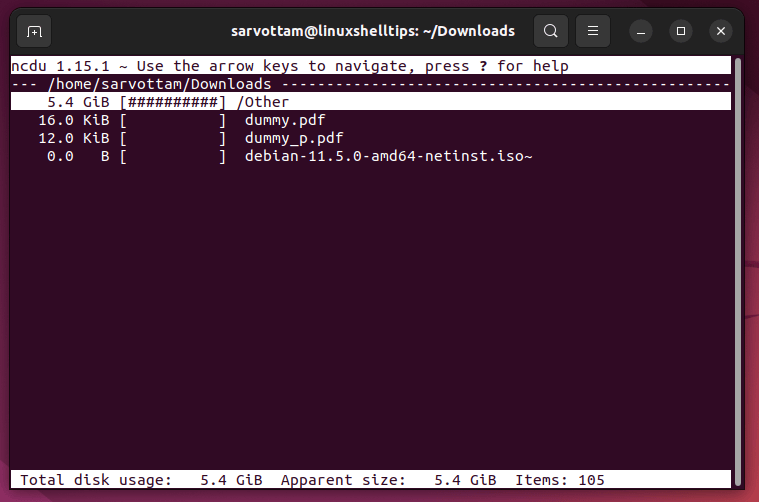
If you don’t pass any arguments, ncdu analyzes the current working directory. You can use arrow keys to navigate up and down and press the Enter key to enter a directory and analyze further. To close the application, press ‘q’ for quit.
If you want to check disk usage in a particular directory, just pass the path also:
$ ncdu /
4. Duf Command
Enough of terminal-based UI, do you just want complete disk usage data in a table? Duf (Disk Usage/Free Utility) is yet another simple alternative to du with the user-friendly and colorful output written in Golang programming language.
To install duf on Ubuntu, Linux Mint, Pop_OS!, and Arch Linux distribution, run:
$ sudo apt install duf         [On Debian, Ubuntu and Mint]
$ sudo pacman -S sshpass       [On Arch Linux]
For other Linux-based distributions, you can download the duf package and install it using your package manager.
After installing it, hit ‘duf‘ in a terminal that will provide concise details about disk usage in a tabular form. Each table containers data specific to particular devices.
$ duf
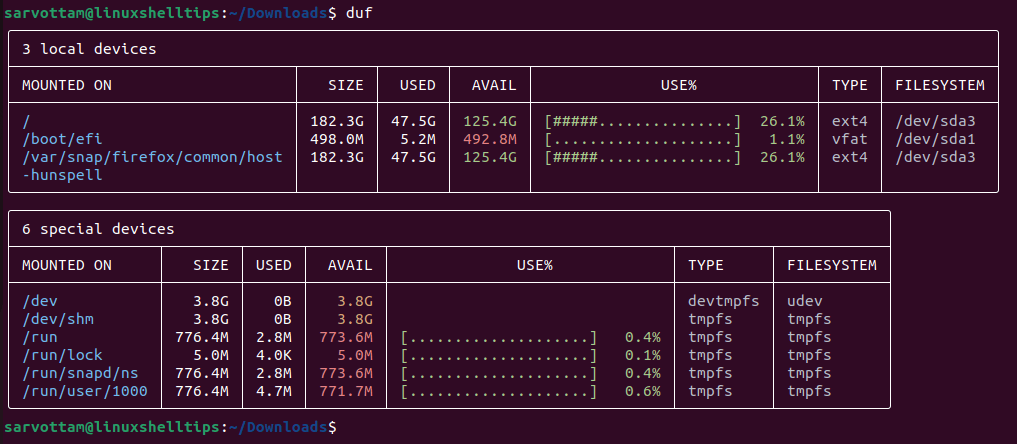
For long detailed information, you can use the --all option available for the duf command.
5. Diskus Command
Now, let’s check for a minimal and fast alternative to the ‘du -sh’ command. Diskus is a very simple utility that just computes and displays the total size of the current or given directory.
As its developer claims, on an 8-core laptop, diskus is about ten times faster than du with a cold disk cache and more than three times faster with a warm disk cache.
To install diskus on Ubuntu, Linux Mint, Pop_OS!, and other Debian-based distributions, first download the diskus Debian package from the release page using the following wget command:
$ wget "https://github.com/sharkdp/diskus/releases/download/v0.7.0/diskus_0.7.0_amd64.deb"
Then use the dpkg command to install the diskus Debian package:
$ sudo dpkg -i diskus_0.7.0_amd64.deb
For Arch, you can simply install from Arch Linux [Community] repository:
$ sudo pacman -S diskus
Alternatively, if Rust is already set up on your system, use the cargo package manager to install diskus:
$ cargo install diskus
To use the diskus tool, type diskus which will print the total size of the current working directory:
$ diskus

You can also give another directory path as an argument to get particular path disk usage information.
$ diskus /home/linuxshelltips
Graphical Alternative for ‘du’ Command in Linux
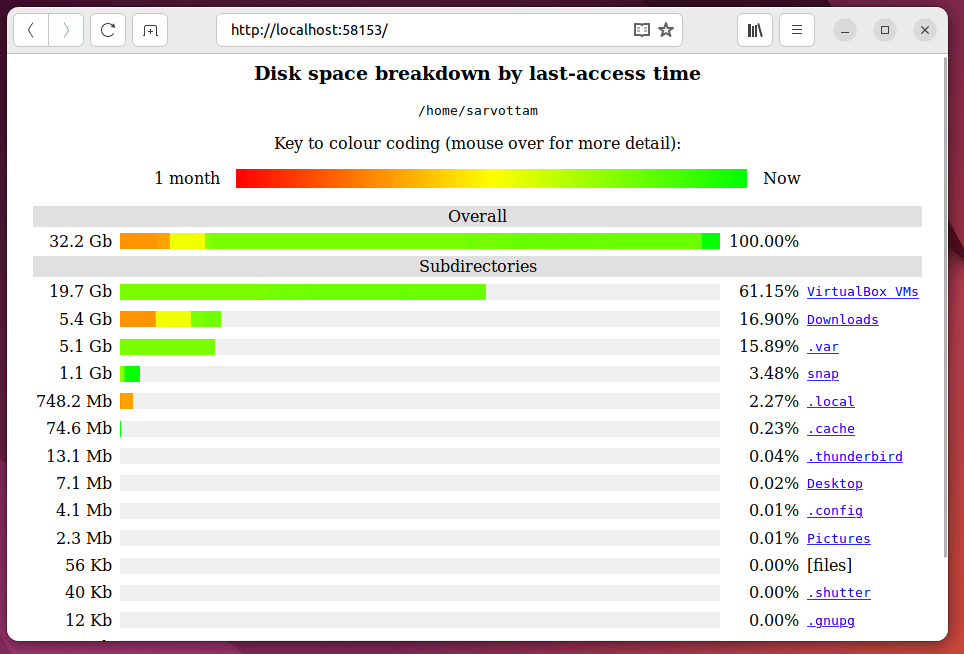
1. Agedu
Agedu is a free and open-source utility similar to du command and goes beyond also to track down wasted disk space used by old files and delete them to free up space.
Along with summarizing the disk usage of each file, recursively for directories, agedu also differentiates between large collections of data still in use and which have not been accessed for months or years.
To install agedu on Linux distributions, run:
$ sudo apt install agedu         [On Debian, Ubuntu and Mint]
$ sudo yum install agedu         [On RHEL/CentOS/Fedora and Rocky Linux/AlmaLinux]
$ sudo emerge -a sys-apps/agedu  [On Gentoo Linux]
$ sudo apk add agedu             [On Alpine Linux]
$ sudo pacman -S agedu           [On Arch Linux]
$ sudo zypper install agedu      [On OpenSUSE]
Now to use agedu, you need to scan the given directory you want to analyze to build an index file containing a special data structure:
$ agedu -s /home/sarvottam

The command generates a large data file called agedu.dat in the given directory.
Next, you can query the index to display disk usage:
$ agedu -w

As you can see, the above command will provide a url that you need to open in your browser to further explore the usage information generated by agedu.
2. GNOME Disk Usage Analyzer
If you’re using Linux distribution with the GNOME desktop environment, it’s most likely that you’ll find a default GNOME Disk Usage Analyzer.
To open the disk usage analyzer, open the Activities panel and search for “disk usage”. In the “Devices & Locations” window, you will see your home directory and other different disks.
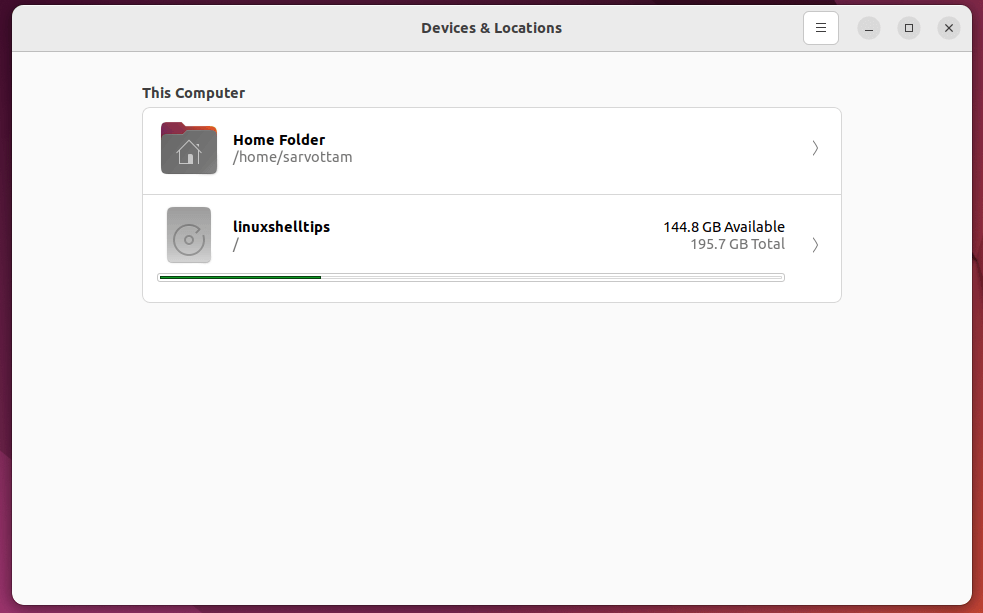
On the top right side, click on the three-line icon (hamburger icon) and select the Scan Folder option. Clicking will pop up a window where you can choose the folder you want to inspect.
3. KDE Filelight
To check disk space on the KDE desktop environment, Filelight is a default graphical utility that provides a colored radial layout.
If you want to use Filelight on Linux distributions, run the below command to install it.
$ sudo apt install filelight         [On Debian, Ubuntu and Mint]
$ sudo yum install filelight         [On RHEL/CentOS/Fedora and Rocky Linux/AlmaLinux]
$ sudo emerge -a kde-apps/filelight  [On Gentoo Linux]
$ sudo apk add filelight            [On Alpine Linux]
$ sudo pacman -S filelight           [On Arch Linux]
$ sudo zypper install filelight      [On OpenSUSE]
By default, Filelight scans the root partition and displays the used and free space percentage. So, to check the disk usage of a particular directory using Filelight, open the Scan menu and select the Scan Folder option to provide the directory path.

You can hover over each ring section to view more information and click it to go inside further into that directory analysis.
Conclusion
In this article, we learned about various command alternatives available for du including both terminal and graphical tools. Since the above tools are free and open source, you can also go beyond to fork the existing project to build your own best du command alternative and check disk usage in Linux.