Brief: This article guide highlights and demonstrates the usage of some useful Git commands for handling distributed version control on Git-repository management systems like GitHub and GitLab.
About Git
Git software empowers distributed version control by tracking different or grouped file changes, and collaboratively coordinating work among developers and programmers interested in developing software source code.
Git makes it possible for developers and programmers to periodically access and modify application source code from different hosted repositories. It also supports backtracking in order to undo already implemented changes. Also, Git supports the versioning of a project to keep track of changes and improvements made throughout the lifespan of the project.
Useful Git Commands Cheat Sheet
The Linux command-line environment is ideal for interacting with the Git repository via the Git CLI (command-line interface) tool. We are going to address several use cases of the git commands in dealing with both local and remote repositories.
Now that we have acknowledged what Git can offer us, let us look at some of its useful commands.
1. git config – Set Git Configuration Values
The git config command sets Git repository configuration options to determine how Git behaves either globally or on a project basis.
Set a Git Username
To globally set username and email address associated with a git repository, implement:
$ git config --global user.name "your_username"
$ git config --global user.email "your_email_address"
To set a repository’s username and password on a project basis (not globally), implement:
$ git config user.name "your_username"
$ git config user.email "your_email_address"
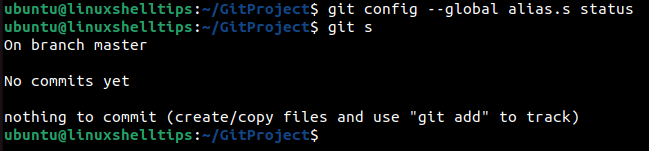
Create Git Aliases
We can also use the git config command to create Git aliases as shown.
$ git config --global alias.s status
The above command shortens the status to s, therefore, instead of running:
$ git status
We will run:
$ git s
Set a Git Editor
The git config command is also ideally used to set a user’s preferred text editor when writing or editing commit messages:
$ git config --global core.editor "editor-name" [Globally]
$ git config core.editor "editor-name"          [Project Basis]
Replace “editor-name” with the name of the text editor you are using.
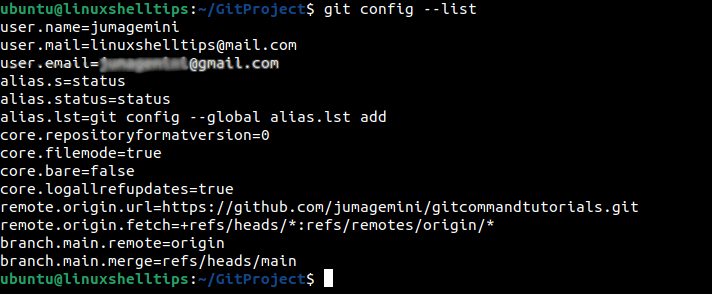
List Git Config Properties
Additionally, an active repository’s current configuration options can be viewed with the following git config command:
$ git config --list
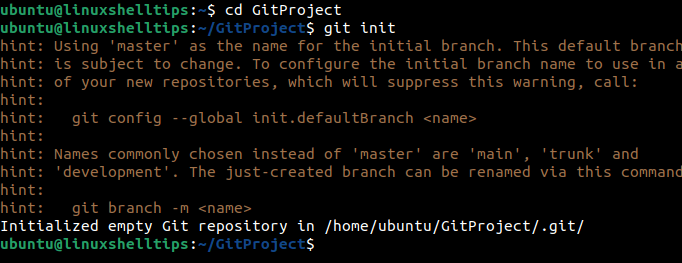
2. git init – Creates a New Git Repository
The git init command enables the initialization of a Git repository on the current directory of your local file system. It additionally creates a '.git' subdirectory (hidden directory) that contains necessary repository files like index and object database files.
$ cd /path/to/project/codebase
$ git init
3. git clone – Clones a Git Repository
The git clone command gives you access to other user repository code bases, which makes it easy to download and personalize numerous publicly accessible user repositories.
If you are interested in a hosted public repository on a platform like GitHub, you can retrieve it by specifying a valid Git URL to the repository:
$ git clone [URL]
On GitHub, it will be something like this:
$ git clone https://github.com/username/repository_name.git
The above implementation can be highlighted with the following example:
$ git clone https://github.com/jumagemini/gitcommandtutorials.git

You can also specify a directory for downloading the targeted repository:
$ git clone https://github.com/jumagemini/gitcommandtutorials.git test-dir
The above command downloads the gitcommandtutorials repository into the test-dir directory.
On the other hand, you might be interested in cloning a specific repository branch:
$ git clone --branch <branch_name> [URL]
or
$ git clone -b <branch_name> [URL]
For example:
$ git clone -b developer https://github.com/jumagemini/gitcommandtutorials.git

4. git add – Add File Contents to Staging
The git add command is useful in collecting files for staging. The staging area (also called index) provides temporary storage of collected files while tracking file changes associated with the current/active repository before any repository commits are made. The file(s) needs to already exist.
Add a Single File
To add a single file for staging, implement:
$ git add [file_name]
Add Multiple Files
To add multiple files for staging, implement:
$ git add file1 file2 file3
Add All Files
To add all files for staging (new and modified files), implement:
$ git add -A
Add Deleted and Modified Files
To only add deleted and modified files for staging, implement:
$ git add -u
Add Files on the Current Directory
To add all created and modified files in the current directory for staging, implement:
$ git add .
Add Files with Specific File Extensions
To add all files associated with a specific file extension e.g, Python files, implement:
$ git add *.py
5. git rm -f – Remove Files from Git Repository
The git rm command is useful in deleting unwanted project files from a git repository. The -f flag forces the deletion of files with restrictions preventing normal deletion. It also stages the deleted files for commit so that the hosted repository is aware of deleted project files.
Delete a Single File
To delete a single file, implement:
$ git rm -f file4.txt
Delete Multiple Files
To delete multiple files, implement:
$ git rm file1.txt file2.php file3.py file4
Delete a Directory
We can also use the -r flag to recursively remove a project directory and its content:
$ git rm -f -r directory_name
6. git mv – Move or Rename Git Repository Files
The git mv command moves and rename Git repository files. The changes from these move and rename operations are also staged to be committed to the repository.
Rename a Project File
To rename a project file, implement the command:
$ git mv old-name.txt new-name.txt
Move a Project File
To move a project file to a different directory, implement:
$ git mv file3.txt beta/file3.txt
The above git mv operation can be summarized by three sub-operations:
$ mv file3.txt beta/file3.txt
$ git add beta/file3.txt
$ rm file3.txt
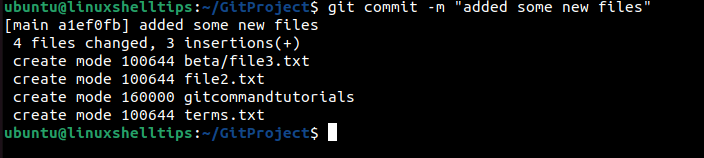
7. git commit – Saving Changes to Git Repository
Commits are important for version control since a snapshot copy of the code base is archived by git. The git commit command permanently stores (in the repository) staged changes from the git add command.
Add a New Commit
To add a new commit, implement:
$ git commit -m "commit message"
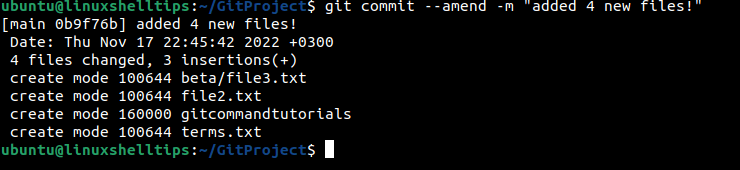
Fix a Previous Commit
To fix a previous commit (amend a commit error), implement:
$ git commit --amend -m "commit message"
Commit Modified Files
To commit all modified files (after staging), use the -a flag as shown:
$ git commit -a -m "Commit message"

8. git branch – List, Create or Delete Branches
The git branch command is useful in the listing, creating, and deleting Git repository project branches. In a git repository, a branch is a separate line of development where multiple developers can simultaneously contribute to a project without affecting the codebase of the main line of development (main branch).
List Repository Branches
To list all repository project branches, run:
$ git branch
The current or main branch is marked with an asterisk (*) sign.
Create a New Branch
To create a new Branch, run
$ git branch [new-branch-name]
Creating a new branch, in reference to the above example, makes it possible to independently work on new project features without interfering with the primary codebase on the main branch.
Note that the creation of the above new Branch is on the current commit.
Delete Existing Branch
After working on new project features on a separate branch and successfully incorporating them on the main or master branch, you will have no use for the separate branch and might consider deleting it.
To delete an existing Branch, implement:
$ git branch -d [branch-name]
To avoid errors, make sure you have left the branch before deleting it. For instance, if you are still on a branch called newest and need to delete it, first leave the branch and move into another existing branch or main branch before deleting it.
Move to another branch (e.g main):
$ git checkout main
Now delete the newest branch:
$ git branch -d newest

9. git status – Show the State of the Repository and Staging Area
The git status command verifies the existence of files queued for staging in the next commit. It highlights and displays all added, modified, and/or deleted files and their absolute paths.
$ git status
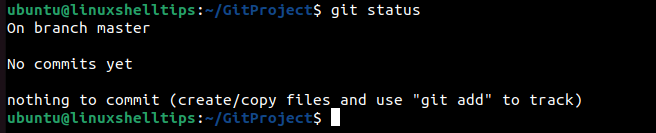
This command is critical to Git workflow (first step) since it displays the current state of repository files (modified and untracked).
10. git diff – Tack Changes in Files
The git diff command is effective in tracking changes (in code bases) since it shows the difference between two file versions, between commits, between the index tree and working tree, and between blob objects. This Git command highlights the added, deleted, and modified changes.
Show Non-Staged but Modified Changes
To showcase non-staged but modified changes (working tree vs index tree), use:
$ git diff
Show Staged but Non-Committed Changes
To showcase staged but non-committed changes, use:
$ git diff --staged
Show the Difference Between the Two Branches
To differentiate two branches:
$ git diff Branch_1...Branch_2
Don’t forget to use the triple dot syntax (...).
An alternative command for differentiating two branches is:
$ git diff Branch_1 Branch_2
To compare a branch to the current code version, implement:
$ git diff branch-name
Compare Committed vs Non-Committed File
To differentiate committed vs non-committed file status, implement:
$ git diff file-name
Compare Two Specific File Versions
To differentiate the current version and commit behind the current version of a specific file, implement:
$ git diff HEAD~1 HEAD file-name
11. git log – Show the Commit History
The git log command displays the git repository’s history. It provides the git user with a preview of implemented repository changes. Such changes include commit changes, author, and date.
Show Commits History
For the commit history of the current active branch:
$ git log

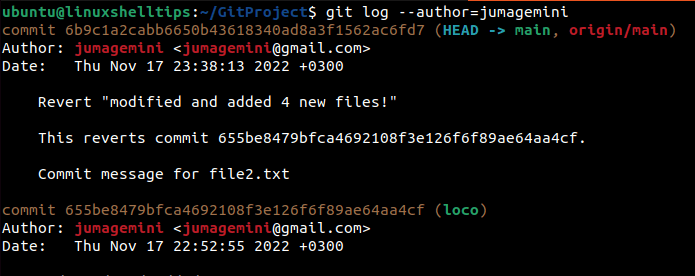
Filter the Git Logs
For the commit history of branch_11 not present on branch_22.
$ git log branch_22..branch_11

Note the use of the double dot syntax (..).
To filter log information by author:
$ git log --author=author_name
12. git checkout – Switching Between Branches
Most software development projects involve teamwork. In this case, several feature and development branches are created. The git checkout command is useful when you want to successfully switch between branches.
Switch to an Existing Branch
To switch to another existing Branch and preview it from your current directory, implement:
$ git checkout [the-branch-name]
Switch to a New Branch
To create and switch to a new branch, implement:
$ git checkout -b new-branch
Here, the branch new-branch is first created before switching to it.
Restore a File’s Previous Version
To restore a file called file3.txt to a currently committed version in the repository, we will implement:
$ git checkout HEAD -- file3.txt
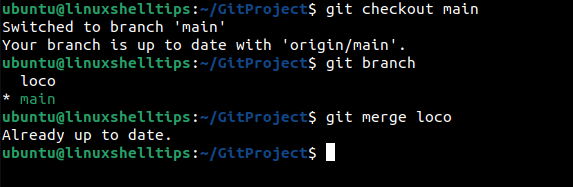
13. git merge – Merging Git Branches
When working on two different branches and needing to merge them, consider using the git merge command, which is useful in joining development histories (two or more) among branches.
You first need to checkout to your stable or active branch (if not already) like the master branch and then merge the development branch.
$ git checkout [active-master]
$ git merge [development-branch-name]
Merging Between Branches
Consider the merge command below:
$ git merge -s ours branch1
Here, branch1 is merged with the current branch (e.g main). However, changes from both branches are not combined. The branch1 changes are discarded and the main branch changes are retained.
The git merge -s ours command is applicably effective when you want to avoid merge conflicts. Note that this command will permanently discard the specified branch changes.
Merge Branches Without Commit
Consider the merge command below:
$ git merge --no-commit branch2
Here, branch2 is merged with the current branch without the option of the automatic commit.
14. git fetch – Downloads a Remote Git Repository
The git fetch command downloads a remote repository’s latest version and updates the equivalent local copy of this repository. It locally stores retrieved references, files, and commits without merging them with the local repository.
To use this command, implement:
$ git fetch [alias]
For instance,
$ git fetch origin
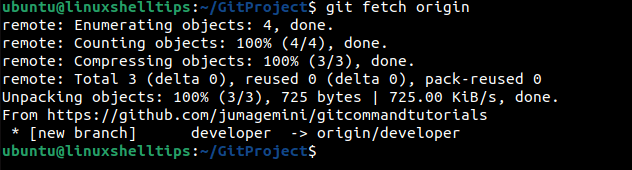
The origin remote avails the latest repository version that updates the equivalent local copy of this repository. When you clone a repository, a default remote called the origin remote is created.
15. git pull – Download and Merge Git Repository
We use the git pull command to download a remote repository’s latest version and subsequently merge it with an equivalent local repository copy. The git pull command combines the functionalities of git fetch and git merge commands.
To check if the local repository is up-to-date with the remote repository, run:
$ git pull
Consider the command:
$ git pull origin
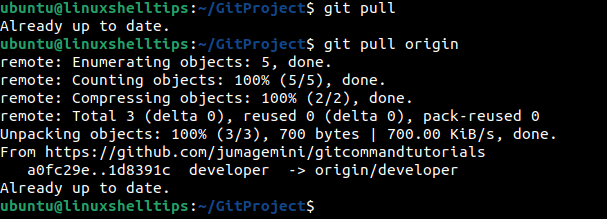
Here, the latest version of the remote repository is retrieved and merged with the out-of-date repository copy on the local machine for both of them to be up-to-date.
16. git push – Updates Remote Branch with Local Commits
The git push command enables a remote repository branch to receive local branch commits. We use this command when the local repository is ahead (more updated) of the remote repository. It makes the remote repository up-to-date with new changes in the local repository.
$ git push

An alternate git push command for updating the remote repository with new changes is shown below:
$ git push origin

To push a branch to the remote repository, specify the branch name:
$ git push origin branch-name
17. git rebase – Change a Series of Commits
The git rebase command integrates changes from branchA into branchB. It takes the current branch’s local commits and replays them on top of the updated code version instead of taking the ‘git merge’ command approach of creating a new commit and combining the changes.
Consider the following command:
$ git rebase branch1
Here, the current branch’s commits are reapplied on top of branch1’s updated code version. The rebase operation only completes if no branch conflicts occur. Otherwise, you will need to first resolve the conflict.
As an alternative to the git merge command, git rebase creates a linear history of commits that are easier to understand and interpret.
While git merge is non-destructive, git rebase has potential pitfalls. It rewrites the project history by generating new commits.
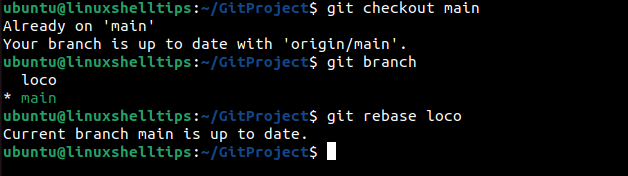
Consider the following git rebase example:
$ git checkout main
$ git rebase loco
The above demo moves the entire main branch to begin on the tip of a loco branch. All loco branch commits are also incorporated.
18. git revert – Revert Existing Commits
The git revert command is useful when there is a need to revert existing/previous commits. It undoes previous/existing Git repository changes. It creates a new commit for the reverted commit changes and leaves the repository in a clean state as if the implementation of these removed changes never took place.
The syntax for the git revert command is as follows:
$ git revert <commit_hash>
The usage of this command requires the implementation of several steps.
The first step is to retrieve the commit_hash which is a unique identifier for all implemented commits.
To get the commit hash, run either of the following commands:
$ git log -1 --format=format:"%H"
or
$ git rev-parse HEAD

Afterward, we should run the git revert command by implementing the above generated <commit_hash>. A sample implementation will look like the following:
$ git revert 6b9c1a2cabb6650b43618340ad8a3f1562ac6fd7
Executing the above command will open a file for you to enter a commit message related to the reverted commit.
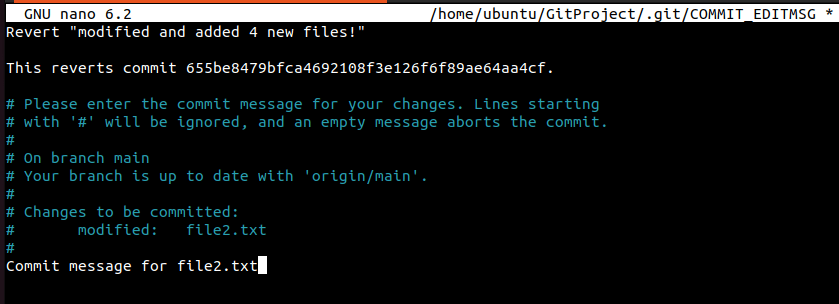
Save and close the file:

You will have successfully reverted an existing or previous commit.
19. git reset – Revert Git Repository Commits
The git reset command undoes Git repository commits. The undone commits can be permanently removed from the repository hence this command can be used to discard them. It also resets a repository to a previous state and moves to a previous commit to the branch pointer.
To unstage a specific project file and retain the current working directory changes, implement:
$ git reset [file_name]
To clear the staging area and rewrite the working tree in reference to a specific commit, implement the command:
$ git reset --hard [commit_hash]
The --hard option discards the commit and modifies the working directory. To discard the commit and not modify the working directory, use the --mixed option.
To neither discard the commit nor modify the working directory, use the --soft option.
To get the commit_hash, run:
$ git log -1 --format=format:"%H"
or
$ git rev-parse HEAD

Another approach to using the git reset command is as follows:
$ git reset HEAD~1
In the above command, the branch pointer is moved to a commit behind the current commit, facilitating the removal of the most recent commit. Here --mixed is the default option.
20. git stash – Saves Uncommitted Changes Locally
The git stash command temporarily shelves project changes like tracked and modified files while a user works on something else (e.g switches branches) before returning to reapply these project changes. These temporarily saved changes are not committed (git commit).
To save modified and staged project changes, run:
$ git stash
To stash a project with a message, use the save option as follows:
$ git stash save "saved changes for branch1"
The above changes are made in the current branch.
To list stashed file changes of StackOrder:
$ git stash list

To re-apply the saved stash after moving back to the branch with the stash, run:
$ git stash apply
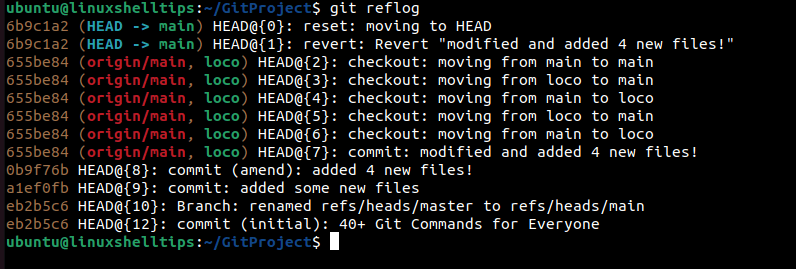
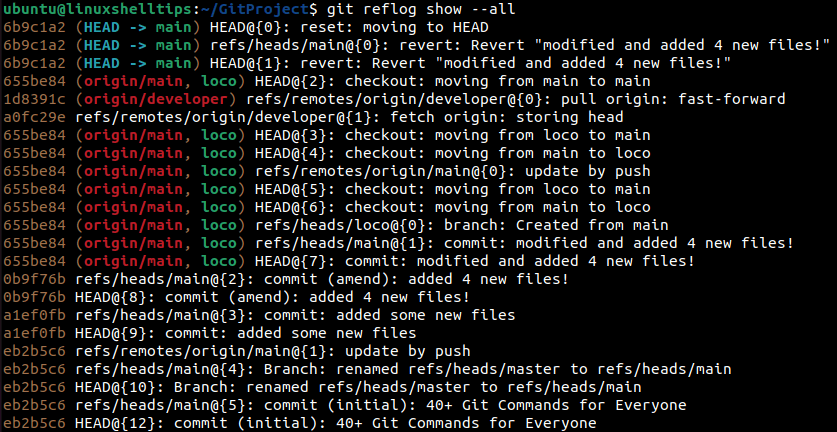
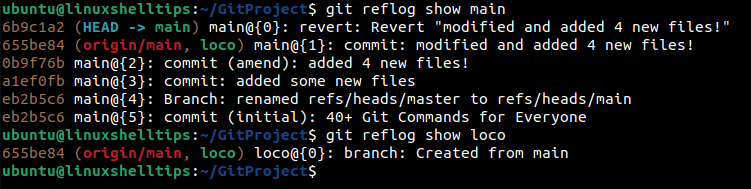
21. git reflog – Keep Track of Changes to the Branch
The git reflog command is useful when dealing with reference logs. It references the local branch while displaying the history of changes in a Git repository. The output of this command entails commit hash, performed action, and branch name tied to the change.
For HEAD reflog of recent reverts, pulls, commits, etc, run:
$ git reflog
For reflog of all references(refs), run:
$ git reflog show --all
For a specific Branch’s reflog e.g main, run:
$ git reflog show main
Conclusion
The Git commands covered in this article guide should propel you on your projects’ workflow through the mastery of version control, collaboration, branching, merging, speedy development, and many more useful features that Git CLI brings to the table.
Always remember that the rule of ‘practice makes perfect’ is continually applied in the usage of git commands. The more you practice these commands, the more they are imprinted in your muscle memory.
For more git command options, consult its manual page by running man git.